The WW2 Balsdean presentation I gave to the Sussex Military History Society last month was very warmly received. I plan to rework it into a suitable form to include in this blog, though it is likely to be a while before that happens. One reason is that I used several animated transitions comparing current views from Google Earth with old photos, as well as short videos of Google Earth fly-throughs to help my audience discover the location of the various places of interest given in the talk, as well as to better visualise the landscape as a whole. These were particularly tailored to the presentation media used and will probably need to be rerecorded so as to be more suitable for this website.
Open Source Tools
Meanwhile, I have been asked to share how I achieved the animated transitions that were used in my talk. Firstly I should say that I mostly use free, Open Source tools wherever possible. This is partly for ethical reasons, partly because they are free (as in speech, not lunch), and partly because they (almost always) enable me to get my stuff done. However, if necessary I do use closed source and non-free software, such as Google Earth, if there are no suitable alternatives.
The first and most important of my Open Source tools is the Ubuntu Linux operating system. I have used Linux for many years now and only very rarely have I needed to switch to Windows. Of the many varieties of Linux I chose Ubuntu because of its large user base and excellent online support.
For my presentation I used LibreOffice (a version of OpenOffice) Impress. It is almost completely compatible with Microsoft PowerPoint, has similar capabilities and can be run on Linux, Windows and Apple Mac computers. Other presentation apps are available!
For editing photos and other images I mainly use Gimp, an open source alternative to Photoshop which can also be run on Linux, Windows and Apple Mac computers. Other image editors are also available! I used to it to improve the images (contrast, brightness, colour, etc), reduce their resolution to that of my projector, and to crop them, as and when required. I also used it’s layer capabilities to line up my screenshots taken of GoogleEarth views, so to as closely as possible match the views shown in my old photographs of Balsdean, etc.
Unfortunately there is no alternative that I know of to Google Earth for detailed exploration of 3d satellite images. Its ability to import geo-referenced images was especially useful. To do this I used QGIS, an open source geographic information system, similar to ArcGIS in capabilities. It is also available to download on most computers. Other GIS programs are available!
To share my Google Earth fly-throughs, I needed to capture my desktop display as a video. The program I chose was recordMyDesktop. It has a pretty basic functionality, but was adequate for my purposes. It only runs under Linux, though there are many alternatives that work on different platforms.
Unfortunately the file size of the videos produced by recordMyDesktop were quite large, so I used a graphical front-end to FFmpeg called WinFF. FFmpeg is very good at video conversion, but I find its command line use too overwhelming. WinFF gives a huge range of tweakable presets, which after some experimentation, did exactly what was needed. It is only available on Windows and Linux. A huge number of video conversion tools are also available, including many that run on Apple Macs.
File Size Reduction
One of my biggest challenges was the file size of the finished presentation. I have a relatively powerful laptop but it quickly started to struggle with the accumulation of large images and videos that made up my one hour, particularly image heavy, presentation.
Memory Allocation
This was dealt with on two levels. Firstly I explored the memory allocation of my presentation program. Based on research via a number of sites found on Google I increased its memory allocation to 200 MB. For LibreOffice Impress 5.1 this can be changed via:
Tools -> Options -> LibreOffice -> Memory
Graphics Cache
   Use for LibreOffice:      200 MB
   Memory per object:        20 MB
   Remove from memory after: 10 mins
Cache for Inserted Objects
   Number of objects:        100
I have no idea whether these were the best settings for my needs, but they worked for me, especially during the editing process. They gave the program an enormous performance boost, and improved its stability as well.
Projector Resolution – Scaling &/or Cropping of Slides
My computer projector has a relatively low resolution, just 800 x 600 px. However I consider it is perfectly adequate for everyone except perhaps the front row of the audience. Therefore the relative proportions of the presentation’s slides were set in Impress to be the same as that of the projector, i.e. 4:3:
Slide -> Page/Slide Properties -> Page
Paper Format
   Format:      Screen 4:3
   Width:       [default setting]
   Height:      [default setting]
   Orientation: Landscape
However, many of my images were of a much higher file size than 800 x 600 px, and many were of differing aspect ratios. Cropping such images to the relative proportions of the projected slides not only reduced their file size, but also made it much easier to accurately orientate my imported images to completely fill the slide (which is how I like it – though only if appropriate). To do this in Gimp I used the crop tool. Selecting this brings up a Tool Options menu:
Crop
   Fixed:   Aspect ratio
      4:3
Scaling the image to the screen size (or that of its maximum height or width) enabled a significant reduction in the file size of the presentation. In Gimp this was done via:
Image -> Scale Image
Image Size
   Width:   800 px
   Height:  600 px
Video Compressing & Resizing
I also created a number of videos of Google Earth fly-throughs. These needed both reducing in size and improvements in compression – but without serious loss in quality. The fly-throughs were captured by recordMyDesktop. The good news is that it enables a box to be drawn around the area required to be captured. The bad news is that I could only do this very approximately using a tiny preview screen, and the relative proportions of the selected area could only be guestimated by eye. Fortunately I only wanted adequate, not perfect results. More good news is that it records high quality *.ogv formatted video (open source!). The bad news is that the file sizes were very big. Fortunately I was rescued by WinFF. To convert and resize the captured fly-throughs I clicked on the green Add plus sign to find and select the relevant video. After experimenting with its various settings I found the best compromise between compression, resolution and file size to be obtained via:
Output Details
   Convert to:    MPEG-4
   Preset:        MP4 Fullscreen
   Output Folder: Use Source Folder
Then, making sure that Options had been selected, I opened the FFmpeg tab to reveal the command line magic which does all the hard work. Looking for the part which has something like:
scale=w=640:h=480
I changed this (carefully) to:
scale=w=800:h=600
Then clicked on the Convert button to let it work its magic. Comparing the results with the original (almost always) gave adequate results for a huge reduction in file size of over ninety percent.
Then and Now Images using Google Earth


Till now I have only dealt with the important but boring, bread & butter of my presentation’s construction. Now for one of the exciting contents of my slideshow sandwiches; the before and after transitions.
Whilst superficially a simple transition, this proved fairly challenging – till I learnt a way of getting an adequate result. Firstly, my laptop has an aspect ratio of more than 4:3. Therefore I adjusted the width of Google Earth’s left-hand side panel till the central 3d-map view had the same approximate aspect ratio as that of my projector, namely 4:3.
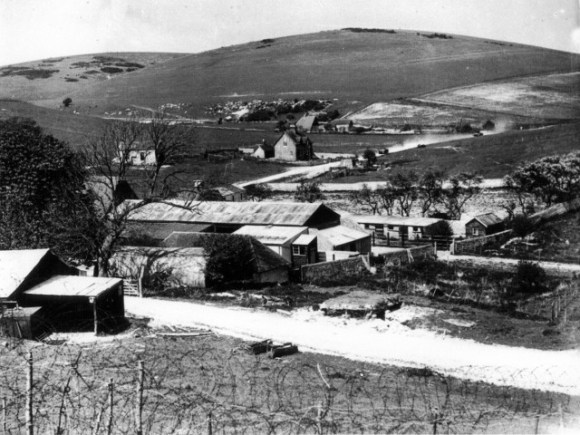
Next, as can be seen in the Google Earth image shown here, it has a much wider angle of view than the original photograph. Therefore lining up the two proved to be somewhat challenging. The background hills in Google Earth appear much smaller and further away. I found that if I lined up the skyline and the main features of interest, the position of the camera was often astray. Fortunately I was only striving for adequacy. It may be possible to do more with Google Earth Pro, but sadly it does not run under Linux.
Once I had lined up the view in Google Earth, I needed to save it (for the fly-through I created later). This I did by adding a Placemark (a yellow pin), and giving it a suitable name and description. Once saved it will appear in the left-hand panel under Places. For my talk I had several of these placemarks, so created folders to help organise them all.
However, this view was (initially) only viewable in Google Earth, and had a great yellow pin right in the middle of it! Fortunately, in the left-hand pane under My Places, a tick box associated with this view (placemark) could be unticked to hide it. Alternatively, right-clicking on the placemark and selecting properties enabled the pin to be dragged to a more suitable location. Then a screenshot was taken, and the image cropped to the screen aspect ratio, as explained in the previous section.
My before and after (then and now) images were now ready for the slideshow. A simple slide transition was next needed to move between them. I found that a transition between slides, in at least my version of LibreOffice Impress, was far from smooth whereas a custom animation within a slide was beautifully smooth. To do this I needed to insert the first image to be used into the slide, then the second image was inserted in front of it. With the second image selected, I selected:
Custom Animation
Effect Fade In
   Start: On Click
   Speed: Very slow
This worked for me very nicely. So next, the really exciting stuff…
Google Earth Fly-Throughs


The following step was to prepare a destination for the first fly-through. In this case it was to a similar view, captured from Google Earth, of my next old photograph, that of the pre-WW2 Balsdean hamlet taken about 60 metres west of the previous photo. The reason for the fly through was to help the audience orientate themselves in the landscape captured by these two old photos.
To do this I created a new placemark in Google Earth to save this new viewpoint following the method given above. Selecting (double clicking) the first placemark I had previously created (making sure I had unticked its box to remove its named yellow flag) I then double clicked on my second placemark to enable my first fly-through.
Once satisfied with my helicopter ride from viewpoint to viewpoint I opened up recordMyDesktop to capture the fly-through on video (following these instructions). The resized and reformatted video (via WinFF, as explained above) was then inserted into a new slide. Since the first frame of this video was the same as the last image of the previous slide animation, the transition to the video in the new slide was hardly noticeable. Creating a following slide containing a slow fade from this Google Earth view to that of its equivalent photo, I had successfully completed my first fly-through transition in both time and space. I was happy! And apparently my audience were too.
They also liked my next fly-through which was to pull back and upwards to a Google Earth view looking directly down on this area of downland as a whole, encompassing Lewes (where my talk was held) to Balsdean’s north-east, to Brighton & Hove at its south-west.

Overlaying Georeferenced Maps & Images on Google Earth Using Qgis
Overlaid flat maps and aerial photographs onto the 3-dimensional contours of Google Earth was another important part of my presentation. However, how I managed to do this I will save for separate blog entry. Partly because I feel this blog post is long enough, but mainly because I have only just started learning Qgis and the last time I tried this I failed to get it to work!
Comments Welcome
You may have gathered by now that I am not a computer multimedia expert. There are definitely other ways of achieving what I did, and some of them may be better and/or easier. If anyone has some helpful suggestions on alternate ways of achieving similar results, or would like more help on this subject, I would very much welcome your feedback.
